
This was a joint effert between Ladybug and myself to upload this tutorial for stationery. You can send her an email at Ladybug

The following two sites have great wallpaper tubes and tiles . Janes' site at www.psptubes.com. She has great wallpaper tubes and background tiles. I have also found a huge section of boarder tubes (and her tubes are awsome!!!) at Jazzl's site, go check them out! http://jazzltubes.topcities.com/index.htm
Ok here we go :o)
First open your rose background, rose tube and your swag border tube in PSP.
You may obtain them here Ladybug's Supplies
You will also need Bladepro. You can get a trial version here www.flammingpear.com
Click on the rose background and find your background color, I used #F6ECE1. Save it to your custom colors pallete, next we need to find two colors for you frames, I used #853845 for the middle frame and #C8A0A1 for the inner frame, save them both to your custom color pallete as well.
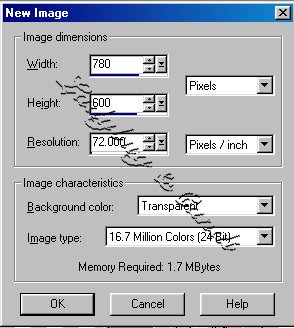
Ok minimize your rose background and open a new #780x600 new image (transparent background) I use this size because wether or not you use 800x600 resolution or higher they both look great, and are centered on the screen. Your background will make up the differance.
Flood fill your new image with your background color that you saved previously in your custom color pallete. Go to your plugins and choose Texturizer, Sandstone using these settings: Scaling 83, Relief 4.

Next open another new image 200x200, this is going to be your background in the script. Flood fill it with the same color as you used above, and add the same Texturizer, Sandstone with the same settings. Save it and place it in your stationary folder you won't need it anymore for this part of the tutorial. Later you will add it to the script.

Ok back to your main image. Change your foreground color to pattern, choosing the rosebud background tile as your pattern fill just so it will be ready when you are :o) With your background Layer active click on your selections tab and choose select all.
Then modify----contract. contract by 30 pixels.

Invert your selection,

Then add a new layer, flood fill the selection area with the rose pattern you got ready earlier. Select None.

Your image should now look like this below

Next we are going to buttonize or bevel your rose border. I buttonized mine with these settings: Height 20, Width 29, Opacity 63, Transparent Edge clicked. I have included screenshots of both ways.


I then added a drop shadow to my rose frame but you don't have to...it's up to you.


ok..still with me??? lol
Now we choose the middle border color for our foreground color.
Next click on the inside of your rose border (making sure that is the layer that is active) Selections modify, contract by 20 pixels.

Add a new layer Flood fill the selection area with your Middle border color (remembering that the selection must still be active on the previous layer)

Selections modify-contract by 15 pixels, Control X to cut the inner part of your fill. Next click on your middle border with your magic wand...go to your plugin folder and open up your Blade pro.

Choose the preset Soclear (if you do not have Blade Pro you can use the inner bevel option under 3D effects on your PSP to add a inner bevel to your frame.) Selections None.
This is what you should have now. I don't have the so clear preset so I used the inner bevel option with the previous settings above. If you want the so clear preset please contact Ladybug.

Next choose your inner frame color that you saved earlier for your foreground color. Using your magic wand click on the inside of your middle frame, selections modify contract by 20 pixels Add a new layer like before.
Flood fill the selection area with your foreground color. then selections modify contract by 10 pixels, then control X to cut the inner part of your fill pattern. Again use the magic want to select your inner frame. Use your Blade Pro again to apply the Soclear preset. As you can see we have our basic frame now :o)
On to the swag border. Next we open our swag border with the main frame still open. We click on the layer pallate and drag the swag border to our frame, I do this however many times I need to (this time being three) so that I have enough of them to go across the inner part of my frame.

I then zoom in close and line them up so they seam together perfectly, don't worry about excess, we will take care of that later.
After doing this I go up to my layer tool and hide all of my other frames and backgrounds so the swag borders are the only ones showing.

I then click on layers, merge, merge visible.

After doing this I then open up all my layers again, then click on the merged layer of swags positioning it just below the inner frame on the layer pallate so that my inner frame is on top of my swag border and then centering the swag border so that the scallops of the swags are centered within the inner frame...hmmm, hope that made sense.
Next we need to get rid of the excess swag border. Make your inner frame active on your layer pallate. Then you need to click on the outside of your inner frame with your magic wand (so that the marching ants are going around the outside of the inner frame. Modify contract by 5 pixels, Selections invert.
Then you need to click on the swag border layer to make it active, hit control X to cut away the excess, selections none.

At this point I then added a drop shadow to my border. In doing this you may notice on the outside of your inner frame there is a slight shadow zoom in close and use your eraser tool to erase any shadow on the outside of the frame next to your swag border. You must be on the swag border layer to do this. Phew! I am long winded. Sorry for that :o)

Ok, now we can add our rose tubes. Click on your rose tube to make it active, again leaving your frame open. Drag the rose tube down to your frame and position if on top of all of your layers, once you get it in the desired spot go to your layer pallate and duplicate the rose layer.

Then mirror it.

I added a drop shadow to these as well.

I then opened my tube tool and chose a sparkle tube and minamized it to 50 percent
I added a sparkle to my rose tube and one on my frame....this is optional, but just thought I would add it.
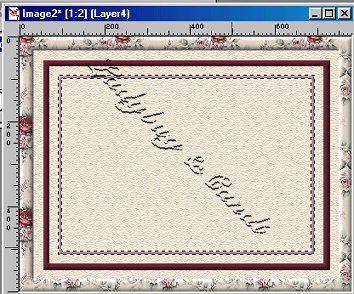
Next I added another layer for my text. placing it on top of all my layers. Using whatever font you like, put in the word E-mail or what ever you would like, to let people know where to click to e-mail you back. This is in the script, but if you don't want it, just leave it off the frame and you can take it out of the script later. I used the Blade Pro preset Soclear on my text as well and added a drop shadow. Don't forget to add your watermark, as I often do..lol. I then merged all my layers and saved my frame.

Next comes the sectioning of the frame and the script. I won't even begin to try and explain this as Joy does it so well at her website. She also has the script for you to download. I have added the link below. http://www.therapids.net/designsbyjoy/ScriptTuts/3sectionsTut/Initaltut4.htm
Once there you will notice you are starting in the middle of her Initial Tutorial, This is ok because the same rules apply in sectioning off your frame. Follow her steps to do this and then it's on to the script. She goes into detail on how to enter the graphics, midi file, background tile, font, etc... into the script. There is nothing that I changed except down at the bottom of the script, right after the place where you enter your e-mail address you need to change the coordinates for your e-mail button. This are the cooridnates I used 120, 28, 280, 110, this centers the box that goes over your email text that you put on the frame. ooops I almost forgot I also changed the section of the script that deals with the table....see below: Here I changed the width of the table border for your text so that it would fit proporly without overlapping your frame. I used 70%, you may need to play with it a bit depending on the width of your frame.
One last note before you head into the PSP play room, When
making your frame
be concious of the fact that because this frame is sectioned off into three
sections you don't want to make the center area of the frame with a busy
pattern. Once you section off the frame to Top, Middle and Bottom. the
middle section is what is going to expand the stationary as you type. It
will tile down as you go. I learned this thru trial and error. I hope you
have enjoyed this tut. If you have any questions or comments please let me
know.
Hugs Glenda...aka Ladybug
P.S. I would really love to see
what you all come up with :o)